- Products
-
 Email and Contacts API
 Unified bi-directional sync and parsing for any provider.
-
 Calendar API & Scheduler
 Real-time availability and embeddable white-label booking.
-
 Notetaker API
 Capture, transcribe, and extract structured data from meetings.
-
 Agent Accounts
 Deploy, automate, and execute intelligent actions on your behalf.
-
- Solutions
- Developers
Jump to section

Jump to section
Professionals across various sectors face the challenge of coordinating multiple appointments while maintaining productivity. And the traditional method of scheduling via multiple email exchanges outside of your app is time-consuming and prone to errors and miscommunications. This is where a robust appointment scheduling system becomes invaluable.
Whether you’re running a medical practice, a consulting firm, or a personal coaching service, integrating a robust appointment scheduler in your React app can significantly enhance user experience and streamline your operations.
This blog post will guide you through the process of how to create an appointment scheduler in your React app using Nylas Scheduler. We’ll explore the power of Nylas Scheduler’s API and UI components and show you how to leverage these tools to build a feature-rich scheduling solution.
Introduction to the Nylas Scheduler

The Nylas Scheduler is a comprehensive scheduling solution that offers both a powerful API and pre-built UI components. It simplifies the complex task of managing appointments across different time zones and calendar systems. By integrating Nylas Scheduler into your React app, you can quickly implement professional-grade scheduling features without reinventing the wheel.
In this tutorial, we’ll cover:
- Understanding the Nylas Scheduler UI components
- Setting up your React application
- Integrating Nylas Scheduler UI components
- Enhancing the Scheduler with Nylas API
- Connecting Nylas to your appointment scheduler
- Customizing the Scheduler UI
Let’s dive in!
Understanding Nylas Scheduler UI components
The Nylas Scheduler provides two main UI components that make it easy to implement scheduling functionality:
1. Scheduler editor component
The scheduler editor component is the command center for organizers — be they business owners, service providers, or administrators. This powerful tool allows you to create and manage scheduling pages with ease. Here’s what you can do with it:
- Create event types: Set up different types of appointments (e.g., “30-minute consultation”, “1-hour deep dive”, “15-minute check-in”) with specific durations and details.
- Define availability: Specify your working hours, lunch breaks, and any recurring unavailability.
- Set buffer times: Add padding before or after appointments to give yourself time to prepare or wrap up.
- Customize booking forms: Decide what information you need from clients when they book (e.g., reason for appointment, specific questions).
- Manage team availability: If you’re part of a team, you can coordinate schedules to ensure proper coverage.
2. Scheduling component
The scheduling component is what your clients or guests interact with to book appointments. It’s designed to provide a smooth, intuitive booking experience. Here’s what it offers:
- Real-time availability: Shows only the time slots that are available based on your scheduler’s configured settings
- Time zone intelligence: Automatically detects the guest’s time zone and displays available times accordingly, reducing confusion and missed appointments.
- Calendar integration: Checks against your connected calendars to avoid double bookings.
- Customizable appearance: Can be styled to match your brand and website design.
- Mobile responsiveness: Works seamlessly on both desktop and mobile devices.
These pre-built components save development time and ensure a consistent, user-friendly experience across your application.
Setting up your React application
Before we start integrating the Nylas Scheduler, let’s set up our React application. Make sure you have Node.js(version 18.20 or above) installed on your system and follow these steps:
- Create a new React app using Vite:
npx create-vite@latest nylas-scheduler --template react
cd nylas-scheduler
2. Run the development server:
npm run devEnhancing the Scheduler with the Nylas API
To make our scheduler truly functional, we need to connect it to the Nylas API. This will allow us to manage appointments programmatically.
Nylas Scheduler API overview
The Nylas Scheduler API allows you to interact with calendar events programmatically. With the API, you can create, update, and delete events, ensuring your app’s scheduler stays in sync with the user’s calendar.
Setting up the Nylas Sandbox environment
Sign up for a Nylas account and create a Sandbox application to test your integration. This will give you access to the API credentials needed to interact with the Nylas Scheduler API.
- Create a Nylas account: Sign up at Nylas.
- Create a sandbox application: Navigate to the Nylas v3 dashboard and create a new application.
- Get your credentials: Note down the “Client ID” and “API Key” from your application’s dashboard.
Configuring the Nylas API in your React application
Let’s set up the Nylas API in our React application:
Install the Nylas SDK:
npm install nylasSet up environment variables:
Create a “.env” file in the root of your project and add the following:
VITE_NYLAS_CLIENT_ID=YOUR_NYLAS_CLIENT_ID
VITE_NYLAS_API_KEY=YOUR_NYLAS_API_KEY
VITE_NYLAS_API_URI=https://api.us.nylas.com
Replace “YOUR_NYLAS_CLIENT_ID” and “YOUR_NYLAS_API_KEY” with your actual Nylas credentials. Remember to keep your sensitive information secure by adding “.env” to your “.gitignore” file.
Connecting Nylas to your appointment scheduler
Before we begin, install axios in the frontend directory of your project by using the command:
npm install axiosStep 1: Handling CORS with a server:
- Create a new directory for your backend project.
- Initialize a new Node.js project: “npm init -y”
- Install the necessary dependencies: “npm install express axios dotenv cors”
- Create a file named “index.js” and paste the below code into it.
const express = require('express');
const axios = require('axios');
const dotenv = require('dotenv');
dotenv.config();
const cors = require('cors');


const app = express();
console.log(process.env.NYLAS_API_KEY);
const port = process.env.PORT || 3000;
app.use(cors());
app.use(express.json());


// Route to create a Nylas Scheduler session
app.post('/create-scheduler-session', async (req, res) => {
  try {
    console.log(process.env.NYLAS_API_KEY);
    console.log(process.env.NYLAS_GRANT_ID);


// Create Session
    const sessionResponse = await axios.post(
      'https://api.us.nylas.com/v3/scheduling/sessions',
      {
        configuration_id: configId,
        time_to_live: 3600 // Session valid for 1 hour
      },
      {
        headers: {
          'Accept': 'application/json',
          'Authorization': `Bearer ${process.env.NYLAS_API_KEY}`,
          'Content-Type': 'application/json'
        }
      }
    );


    // Return the session ID to the client
    res.json({ sessionId: sessionResponse.data.session_id });
  } catch (error) {
    console.error('Error creating scheduler session:',error);
    res.status(500).json({ error: 'Failed to create scheduler session' });
  }
});


app.listen(port, () => {
  console.log(`Server running on port ${port}`);
});
- Create a “.env” file in the same directory with the following content:
NYLAS_API_KEY=your_nylas_api_key
NYLAS_GRANT_ID=your_nylas_grant_id
PORT=3000- Replace “your_nylas_api_key” and “your_nylas_grant_id” with your actual Nylas API key and grant ID. Start the server by running “node index.js”.
- To use this updated component with your backend, make sure your backend server is running (the one we created earlier).
This server creates an endpoint “/create-scheduler-session” that handles the process of creating a Nylas Scheduler configuration and session. When called, it will return a session ID that can be used in your front-end application and ensure the user doesn’t have to log in every time they navigate to a new page. Nylas recommends you set a Time-to-Live (TTL) value for each session, and refresh the sessions as they expire.
Step 2 a): Using the Nylas pre-built UI components
Integrating the Nylas scheduler editor component
Now that we have already integrated the scheduler component let’s integrate the Nylas scheduler editor component:
- Install the Nylas React package:
npm install @nylas/react@latest- Import and use the scheduler editor component in your React application. Paste it in “App.jsx”:
import { NylasScheduling } from "@nylas/react";
import { NylasSchedulerEditor } from "@nylas/react";
import "./App.css";
function App() {
  const configId = "<SCHEDULER_CONFIG_ID>";
  return (
    <>
      <div style={{ marginBottom: "40px", marginLeft: "50px" }}>
        <NylasScheduling configurationId={configId} />
      </div>
      <div style={{ marginBottom: "40px", marginLeft: "50px" }}>
        <NylasSchedulerEditor configurationId={configId} />
      </div>
    </>
  );
}


export default App;
Replace “YOUR_SCHEDULER_CONFIG_ID” with the actual configuration ID you’ll get from setting up your Nylas Scheduler. Similarly, you can integrate several Scheduler Editor components from the Nylas scheduler editor components page.
Integrating the Nylas scheduling component
Now that we have our React app set up let’s integrate the Nylas Scheduler UI components:
Import and use the scheduling component in your React application. Paste it in “App.jsx”:
import React from 'react';
import { NylasScheduling } from '@nylas/react';


function App() {
  const configId = 'YOUR_SCHEDULER_CONFIG_ID';
  return <NylasScheduling configurationId={configId} />;
}


export default App;
Replace “YOUR_SCHEDULER_CONFIG_ID” with the actual configuration ID you’ll get from setting up your Nylas Scheduler. Similarly, you can integrate the schedule editor components from the Nylas scheduler editor components page.
Customizing the Scheduler UI
The Nylas Scheduler UI components are highly customizable. You can use CSS shadow parts to style various elements of the scheduler. Here’s an example of how you might customize the appearance of several scheduler UI components, such as nylas-booked-event-card, nylas-cancel-booking-form, nylas-canceled-event-card, nylas-date-picker, and more.
The detailed list of components and their styles are given below in the CSS code:
/* 1. manual-confirmation-page */
.manual-confirmation-page {
  border: 2px solid #4B5563;
  padding: 20px;
  border-radius: 8px;
}


/* 2. nbec__card */
.nylas-booked-event-card::part(nbec__card) {
  box-shadow: 0 4px 6px rgba(0, 0, 0, 0.1);
  padding: 15px;
  border-radius: 12px;
}


/* 3. nbf__button-primary */
.nylas-booking-form::part(nbf__button-primary) {
  border: none;
  border-radius: 6px;
  padding: 10px 20px;
  cursor: pointer;
}


/* 4. ncbf__button-cta */
.nylas-cancel-booking-form::part(ncbf__button-cta) {
  font-size: 16px;
  padding: 10px 15px;
  border-radius: 4px;
  border: 1px solid #DC2626;
}


/* 5. ncec__icon */
.nylas-cancelled-event-card::part(ncec__icon) {
  width: 24px;
  height: 24px;
  fill: #6B7280;
  margin-right: 10px;
}


/* 6. ndp__date--selected */
.nylas-date-picker::part(ndp__date--selected) {
  border-radius: 50%;
  padding: 10px;
}


/* 7. nls__timezone-drop-content */
.nylas-locale-switch::part(nls__timezone-drop-content) {

  border: 1px solid #D1D5DB;
  padding: 10px;
  border-radius: 6px;
  max-height: 200px;
  overflow-y: auto;
}


/* 8. nsec__card */
.nylas-selected-event-card::part(nsec__card) {  border-radius: 8px;
  padding: 15px;
  box-shadow: 0 2px 4px rgba(0, 0, 0, 0.1);
}


/* 9. ntp__timeslot--selected */
.nylas-timeslot-picker::part(ntp__timeslot--selected) {

  border-radius: 4px;
  padding: 5px 10px;
}


/* 10. nbec__title */
.nylas-booked-event-card::part(nbec__title) {
  font-size: 20px;
  font-weight: bold;

  margin-bottom: 8px;
}
You can apply similar customizations to other parts of the scheduler to match your application’s design.
Step 2 b): Using custom UI components
1) Create a new file under src named AppointmentScheduler.jsx and paste this code:
import React, { useState, useEffect } from 'react';
import axios from 'axios';
import './AppointmentScheduler.css';
const AppointmentScheduler = () => {
const [appointments, setAppointments] = useState([]);
const [newAppointment, setNewAppointment] = useState({
start_time: '',
end_time: '',
guest_name: '',
guest_email: ''
});
const [sessionId, setSessionId] = useState(null);
useEffect(() => {
getSchedulerSession();
}, []);
const getSchedulerSession = async () => {
try {
const res = await axios.post(http://localhost:3000/create-scheduler-session');
setSessionId(res.data.sessionId);
} catch (error) {
console.error('Error getting scheduler session:', error);
}
};
useEffect(() => {
if (sessionId) {
fetchAppointments();
}
}, [sessionId]);
const fetchAppointments = async () => {
try {
const response = await axios.get('https://api.us.nylas.com/v3/scheduling/availability', {
headers: {
'Authorization': `Bearer ${sessionId}`,
'Accept': 'application/json'
},
params: {
start_time: Math.floor(Date.now() / 1000),
end_time: Math.floor(Date.now() / 1000) + 604800 // One week from now
}
});
setAppointments(response.data.time_slots);
} catch (error) {
console.error('Error fetching appointments:', error);
}
};
const createAppointment = async (e) => {
e.preventDefault();
try {
const response = await axios.post('https://api.us.nylas.com/v3/scheduling/bookings', {
start_time: Math.floor(new Date(newAppointment.start_time).getTime() / 1000),
end_time: Math.floor(new Date(newAppointment.end_time).getTime() / 1000),
guest: {
name: newAppointment.guest_name,
email: newAppointment.guest_email
}
}, {
headers: {
'Authorization': `Bearer ${sessionId}`,
'Accept': 'application/json',
'Content-Type': 'application/json'
}
});
console.log('Appointment created:', response.data);
fetchAppointments();
setNewAppointment({
start_time: '',
end_time: '',
guest_name: '',
guest_email: ''
});
} catch (error) {
console.error('Error creating appointment:', error);
}
};
const cancelAppointment = async (bookingId) => {
try {
await axios.delete(`https://api.us.nylas.com/v3/scheduling/bookings/${bookingId}`, {
headers: {
'Authorization': `Bearer ${sessionId}`,
'Accept': 'application/json'
}
});
console.log('Appointment cancelled');
fetchAppointments();
} catch (error) {
console.error('Error cancelling appointment:', error);
}
};
if (!sessionId) {
return <div>Loading...</div>;
}
return (
<div className="appointment-scheduler">
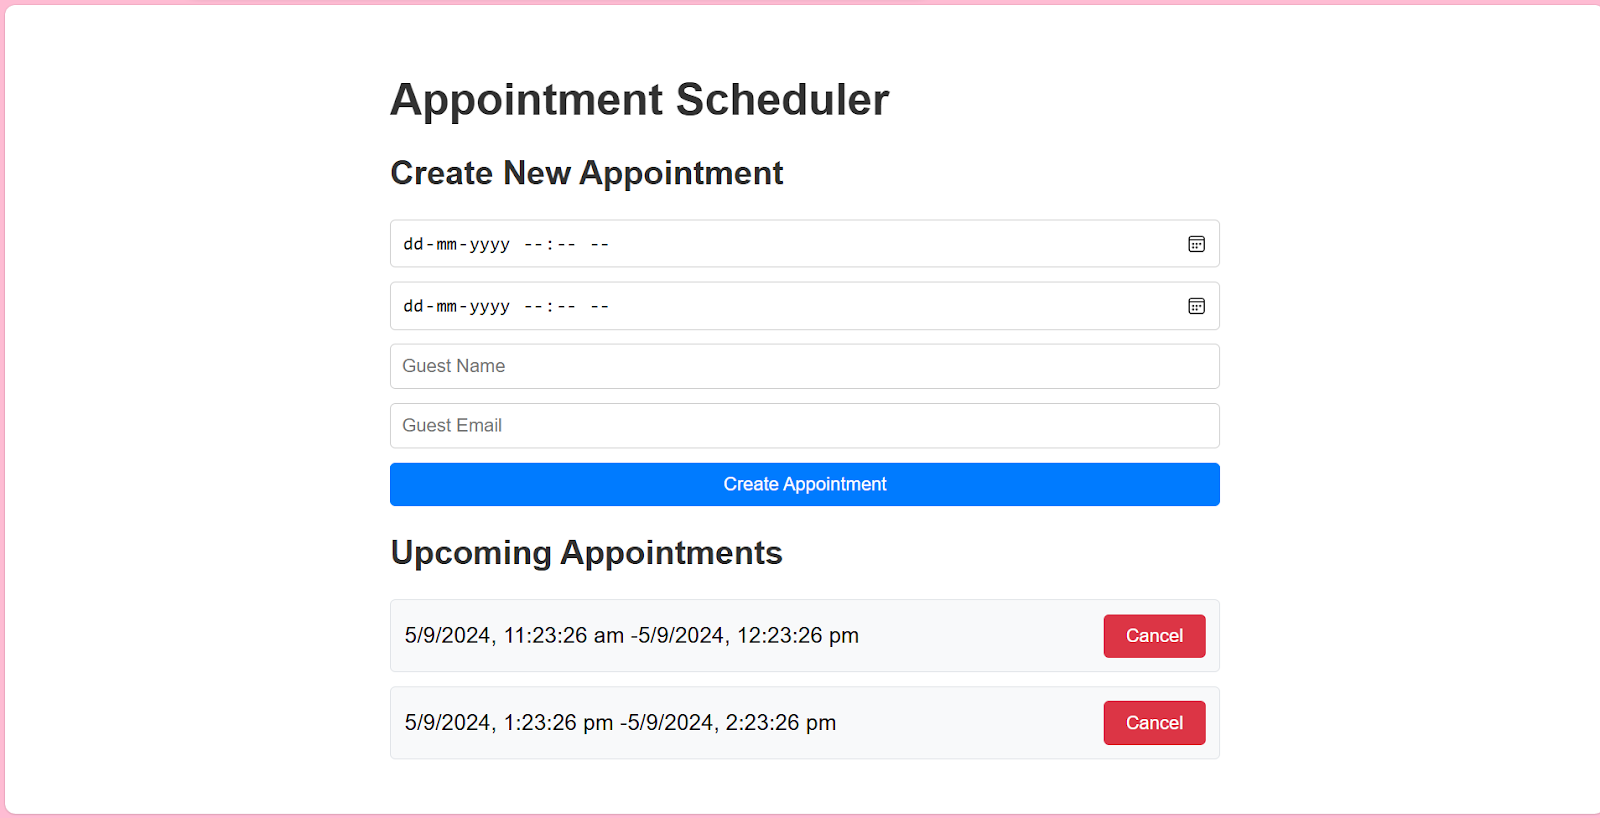
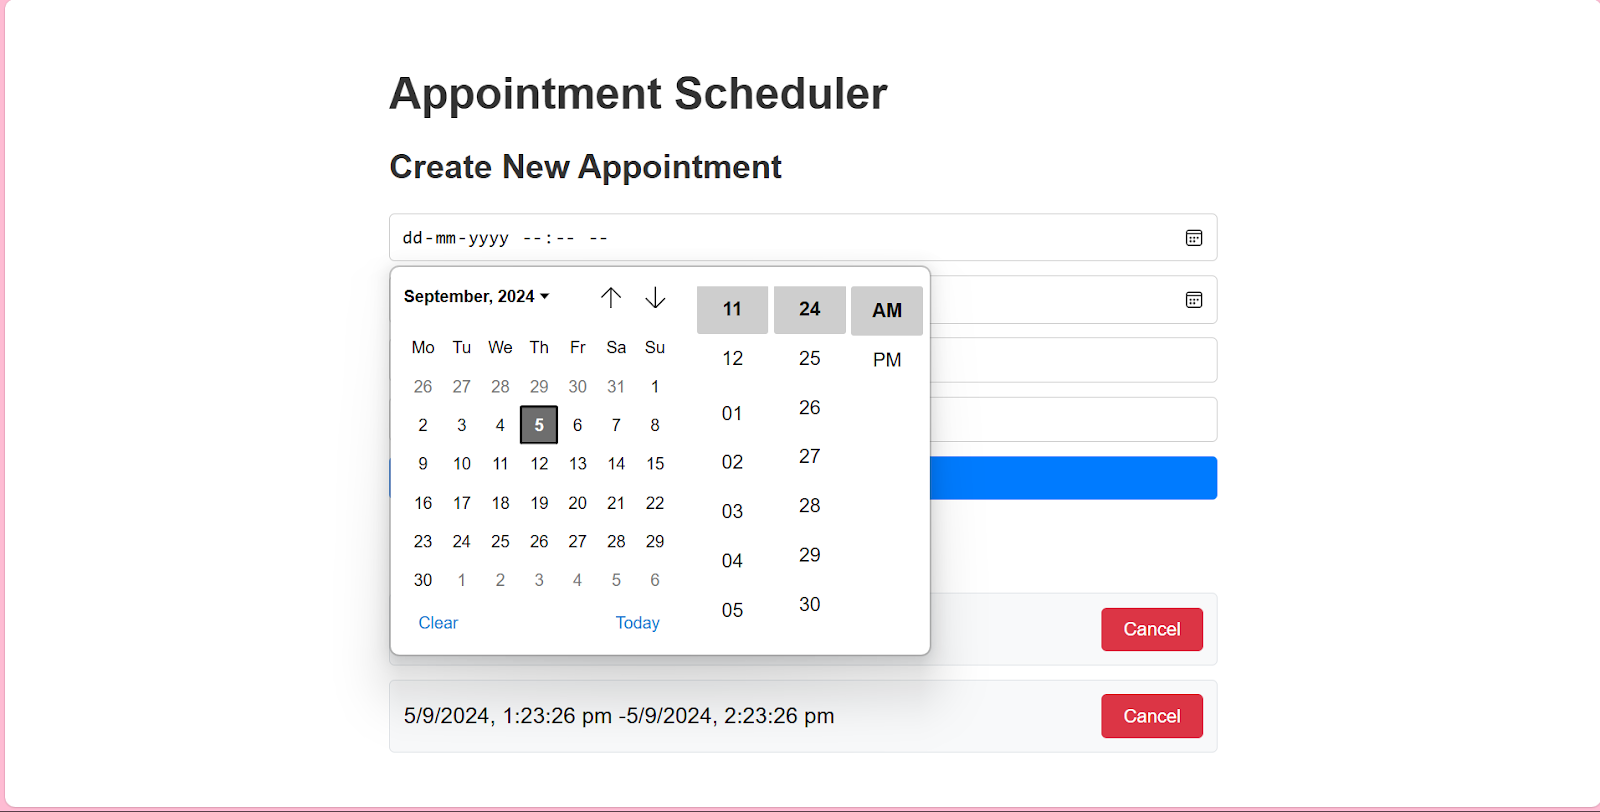
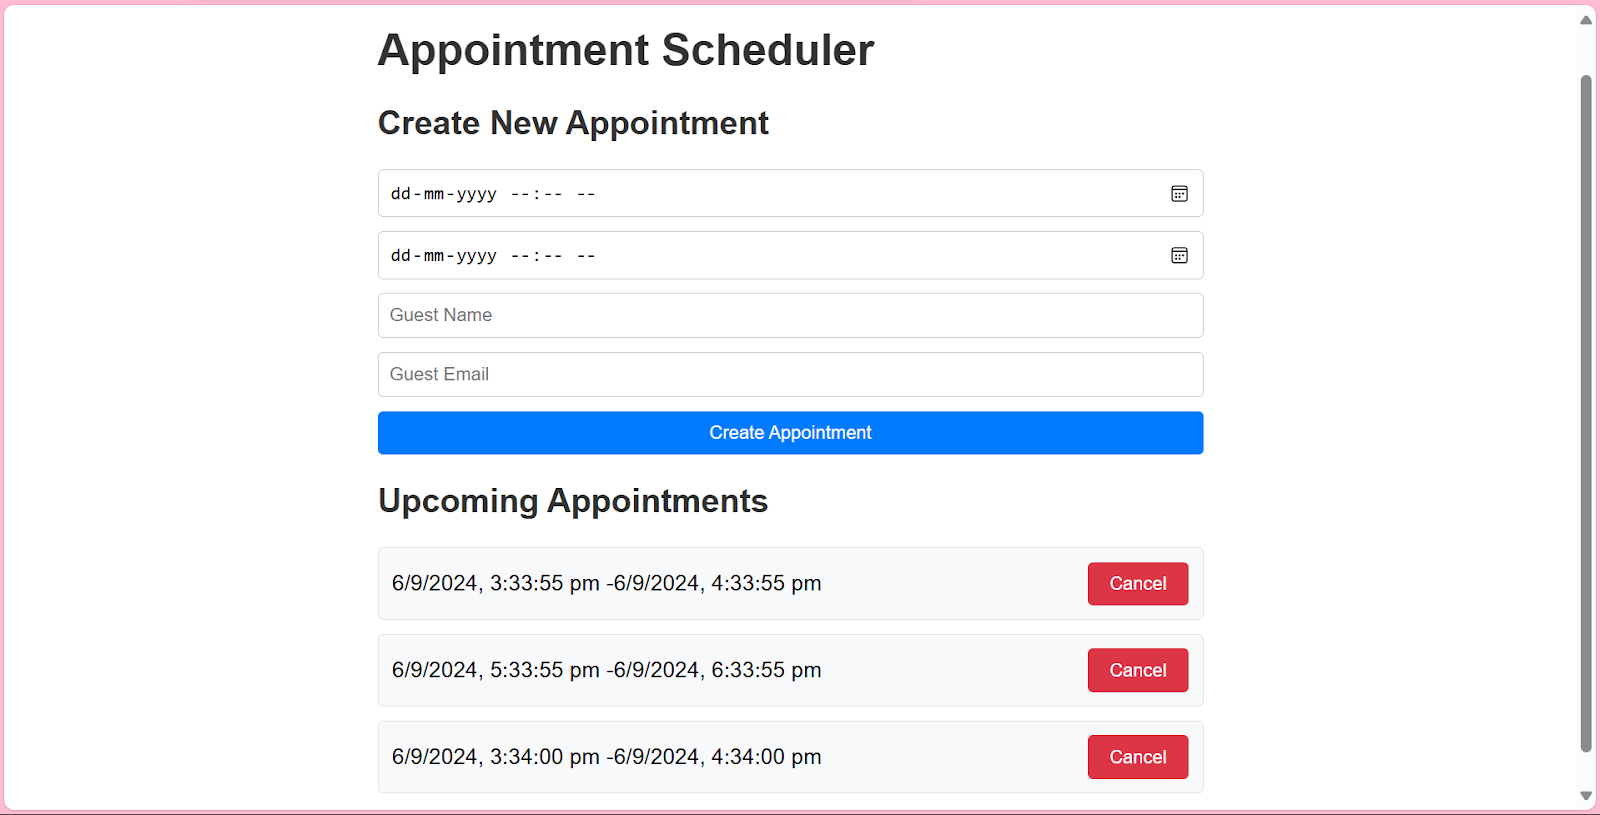
<h1>Appointment Scheduler</h1>
<h2>Create New Appointment</h2>
<form onSubmit={createAppointment}>
<input
type="datetime-local"
value={newAppointment.start_time}
onChange={(e) => setNewAppointment({...newAppointment, start_time: e.target.value})}
required
/>
<input
type="datetime-local"
value={newAppointment.end_time}
onChange={(e) => setNewAppointment({...newAppointment, end_time: e.target.value})}
required
/>
<input
type="text"
placeholder="Guest Name"
value={newAppointment.guest_name}
onChange={(e) => setNewAppointment({...newAppointment, guest_name: e.target.value})}
required
/>
<input
type="email"
placeholder="Guest Email"
value={newAppointment.guest_email}
onChange={(e) => setNewAppointment({...newAppointment, guest_email: e.target.value})}
required
/>
<button type="submit">Create Appointment</button>
</form>
<h2>Upcoming Appointments</h2>
<ul>
{appointments.map((appointment, index) => (
<li key={index}>
{new Date(appointment.start_time * 1000).toLocaleString()} -
{new Date(appointment.end_time * 1000).toLocaleString()}
<button onClick={() => cancelAppointment(appointment.booking_id)}>Cancel</button>
</li>
))}
</ul>
</div>
);
};
export default AppointmentScheduler;
This component fetches appointments from the Nylas API and displays them in a list.
2) Create a new file under src named AppointmentScheduler.css and paste this code:
.appointment-scheduler {
  max-width: 600px;
  margin: 0 auto;
  padding: 20px;
  font-family: Arial, sans-serif;
}


h1, h2 {
  color: #333;
}


form {
  display: flex;
  flex-direction: column;
  gap: 10px;
  margin-bottom: 20px;
}


input {
  padding: 8px;
  border: 1px solid #ccc;
  border-radius: 4px;
}


button {
  padding: 8px 16px;
  background-color: #007bff;
  color: white;
  border: none;
  border-radius: 4px;
  cursor: pointer;
}


button:hover {
  background-color: #0056b3;
}


ul {
  list-style-type: none;
  padding: 0;
}


li {
  background-color: #f8f9fa;
  border: 1px solid #dee2e6;
  border-radius: 4px;
  padding: 10px;
  margin-bottom: 10px;
  display: flex;
  justify-content: space-between;
  align-items: center;
}


li button {
  background-color: #dc3545;
}


li button:hover {
  background-color: #c82333;
}
3) To use AppointmentScheduler, paste this code in App.jsx:
Import and use the Scheduler Editor Component in your React application. Paste it in “App.jsx”:
import  AppointmentScheduler from "./AppointmentScheduler";
import { NylasScheduling } from "@nylas/react";
import { NylasSchedulerEditor } from "@nylas/react";
import "./App.css";


function App() {
  const configId = "<SCHEDULER_CONFIG_ID>";
  return (
    <>
      <div style={{ marginBottom: "40px", marginLeft: "50px" }}>
        <NylasScheduling configurationId={configId} />
      </div>
      <div style={{ marginBottom: "40px", marginLeft: "50px" }}>
        <NylasSchedulerEditor configurationId={configId} />
      </div>
 <div style={{ marginBottom: "40px", marginLeft: "50px" }}>
        <AppointmentScheduler />
      </div>


    </>
  );
}


export default App;
By leveraging the Nylas API in this way, we’ve created a basic but functional appointment scheduler that integrates directly with your Nylas-connected calendar. This implementation demonstrates the core functionality of creating, viewing, and canceling appointments using the Nylas API.
Build time!
In this tutorial, we’ve walked through the process of how to create an appointment scheduler using Nylas Scheduler in a React app. We’ve covered setting up the React application, integrating Nylas Scheduler UI components, connecting to the Nylas API, and implementing basic appointment management functions.
By leveraging the Nylas Scheduler, you can quickly build a robust scheduling solution that integrates seamlessly with various calendar systems. Combining pre-built UI components and a powerful API allows for both rapid development and deep customization.
Remember, this is just the beginning of what you can do with the Nylas Scheduler. As you continue to develop your application, you might want to explore more advanced features such as:
- Implementing multi-user scheduling
- Setting up recurring appointments
- Integrating with other calendar providers
- Adding notifications and reminders
We encourage you to dive deeper into the Nylas documentation and explore these possibilities. Happy coding, and may your calendars always be perfectly scheduled!


